Solceller till Campervan - Välj rätt solpanel för solenergi
Få ut maximalt av solenergi med rätt solpaneler i din campervan. Lär er hur solenergi omvandlas, varför en MPPT regulator ökar laddningseffektiviteten & hur ni optimerar ert elsystem för självförsörjning på resan
SOLCELLER TILL CAMPER VANELINSTALLATIONUTVÄNDIG INSTALLATIONDIY CAMPERVAN
11/4/202417 min read
Vanlife Solar Power Guide:
Harness Sustainable Energy Off-Grid
A beginner-friendly guide for solar power
How Does Solar Energy Work in a Van?




What Size of Solar Panels Do I Need for Vanlife?
How do you charge the batteries in your electrical system?
What Is The Lifespan Of Solar Panels for Cafper Vans?
Do you have aspirations of travelling & living entirely off the grid?
Or if you want to live in your campervan full-time and need electricity for everything, including your coffee maker.
A solar power system is necessary for powering everything from lighting to charging electronics—without having to plug into the grid—whether you're planning for quick trips or a full-time van existence!
I will always remember my first month of driving my first van conversion. I soon discovered that I had all the power I required from a single huge solar panel! The sense of independence was amazing, free from the daily burdens and expenses of winter heating fuel and electricity bills.
Installing a solar system in your campervan is a step toward the ability to roam without worrying about power supplies; it's not just about being self-sufficient. You can adapt the system to your lifestyle by selecting the appropriate parts and being aware of distinctions such as series versus parallel connections, monocrystalline versus polycrystalline panels, and the significance of an effective solar charge controller.
With helpful examples from vanlifers who are already living the dream, we'll go over all you need to know in this guide to install your own solar power setup, from the parts to installation advice. So grab a seat, and let's explore what you need to know about using solar electricity in your van.

Frequently Asked Questions about Solar Power for Campervans
Which kind of solar panel, monocrystalline or polycrystalline is ideal for campers?
Monocrystalline panels are more space efficient and efficient than polycrystalline ones, they are frequently suggested for campervans. Additionally, they thrive in warmer areas, which is advantageous for travel.
Do I need an MPPT or PWM charge controller?
An MPPT controller is more efficient and optimizes your solar panels’ performance, especially when light conditions vary. For the majority of installations, MPPT is a preferable option because PWM is less efficient despite being less expensive.
What’s the difference between series and parallel wiring for solar panels?
Series wiring results in higher voltage, which suits a setup with limited space for a large charge controller. Parallel wiring is ideal if some panels might be shaded since the system will continue to produce power.
How often do I need to clean my solar panels?
Panels should be cleaned frequently to preserve maximum performance, particularly after dusty excursions or pollen-rich locations. The efficiency of dirty panels can be greatly decreased.
Can I install a solar power system myself?
DIY installation is feasible, but safety is crucial, particularly when working with electrical systems. Hiring an electrician to check the installation if you're not sure can be a smart investment for system longevity and safety.
Overview: Components of a Campervan Solar Power System
Before jumping into the installation, let’s break down each component that makes up a solar power system. Each part is crucial for getting electricity in your van—and keeping all your gear running smoothly.
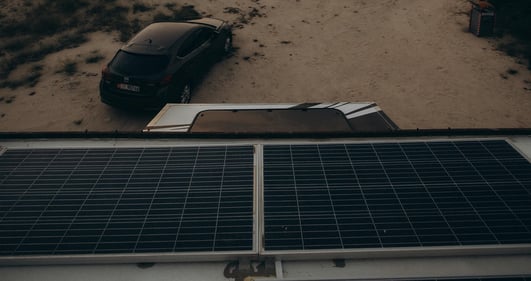
Solar Panels – Mounted on the roof to capture solar energy and convert it into electricity. There are two main types: monocrystalline and polycrystalline panels.
Wiring – Carries electricity from the solar panels to your leisure batteries. You can wire panels in series or parallel, depending on your system.
Solar Charge Controller – A device that regulates voltage to ensure your batteries charge correctly and safely.
Battery – Stores the energy so you can use electricity when the sun isn’t shining.
Mounting Kit – All the hardware you need to install the solar panels on your roof.
How to Install Solar Panels for a Self-Sufficient Vanlife
This post contains affiliate links, which means if you click on a product link and make a purchase from the retailer (Amazon, eBay, etc.), we may earn a commission. The price you pay remains unchanged, whether you use the affiliate link or not. By using these links, you support us in continuing to create free, educational content! To understand our policies on content, affiliate commissions, and responsibilities, please read our terms and conditions.
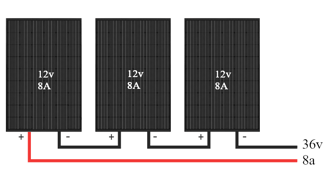
Series – Higher Voltage
When solar panels are connected in series, the positive terminal from one panel is connected to the negative terminal on the next.
Advantages:
Provides higher voltage with the same current (amps), allowing you to use a cheaper solar charge controller.
Can manage with thinner gauge cables.
Generally provides more power and is less sensitive to long installations.
Disadvantages:
If one panel is shaded, the total productivity of the system decreases significantly
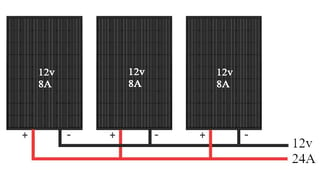
Parallel – Higher Current
When you connect the panels in parallel, the positive terminals are connected to each other and the negative terminals are connected. The current increases while the voltage remains the same.
Advantages:
If one panel is damaged or shaded, the system's performance is not affected as much.
Disadvantages:
Requires a more powerful (and expensive) solar charge controller.
More technical installation.
Usually requires thicker gauge cables.
Which connection is best?
It depends on your needs. A series connection is practical for simpler systems with lower amp requirements, while the parallel connection is good if you need flexibility.
Monocrystalline Solar Panels
Monocrystalline, or “mono” panels, are made from a single silicon crystal, giving them an efficient and sleek dark black look.
Advantages:
Higher efficiency than polycrystalline panels
Longer lifespan and better performance in heat
Disadvantages:
More expensive than polycrystalline panels
May perform slightly worse in colder climates
We prefer monocrystalline panels, for both performance and aesthetics.
Polycrystalline Solar Panels
Polycrystalline, or “poly” panels, have a blue tint and are made from multiple silicon crystals.
Advantages:
Cheaper than monocrystalline panels
Better performance in colder climates
Disadvantages:
Less efficient than monocrystalline, meaning you’ll need more panels to generate the same amount of energy
Solar Power Explained:
How Camper Van Systems Generate Energy
Here’s the short version: when the sun shines on your solar panels, they convert that energy into electricity, charging the van’s leisure battery. This stored energy powers all the electronics in your campervan.
For the solar power system to work effectively, all parts must work together, with each component playing an essential role.
Solar Panels – Which Type is Right for Your Van?
When sunlight hits your solar panels, the energy is absorbed into the PV (photovoltaic) cells, converting it into usable electricity.


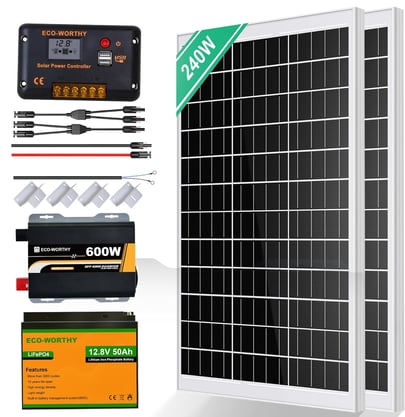
Campervan Solar Panel Kit
More and more manufacturers are packaging solar panels in kits that include everything you need to connect them to your leisure batteries. These kits include appropriately sized solar charge controllers, cables and fuses, eliminating the need to size these components yourself
Both Renogy, Eco Worthy, and Dokio offer ready made kits that make it easier for first-time buyers. If you are instead interested in building your system from scratch, Victron, Renogy, and Eco Worthy are among the largest on the market. All brands offer very reliable options
Renogy offers affordable solar products designed for budget-conscious users, making them an excellent choice for small to medium off grid systems. Victron, although more expensive, is known for premium quality, advanced features and exceptional durability, making it ideal for demanding, high-performance applications. Unfortunately, no complete kits with Victron are currently offered, below we will write more about the most necessary components
Connecting Parallel Solar Panels
To connect parallel solar panels, we have two options: MC4 connectors or a combiner box.
MC4 Connectors or Splitters
One way to connect multiple panels on your roof is to use a device called an MC4 connector or splitter. An MC4 connector gathers many cables into one. If you have 2 panels, you need a 2-to-1 MC4 connector. If you have 4 panels, you need a 4-to-1 MC4 connector.
Combiner Box
Another way to combine solar cables is to use a solar combiner box. This is a consumer unit specifically for solar panels, which both combines and secures them. A combiner box is usually only needed in larger systems with many solar panels. Van conversions can generally be managed with just a set of MC4 connectors.
Securing Solar Panels
It is important to add a circuit breaker between the solar panels and the solar charge controller. Specifically, we need to install a double-pole DC mini circuit breaker (MCB). The MCB should have a minimum rating of 250V. It can be installed on a DIN rail inside a small consumer unit. A solar-specific MCB like the one shown below can easily be purchased online.
MCB Inside a Mini Consumer Unit
We need to use an MCB for two reasons:
Inline breakers are usually rated 16up to 48V. This can cause problems if you connect your panels in series where the voltage increases as panels are added Inline breakers do not meet the requirement "Must disconnect both the positive and negative cable" as stated in NEC 2020 Article 690.13 section (E)
Ready to get started?
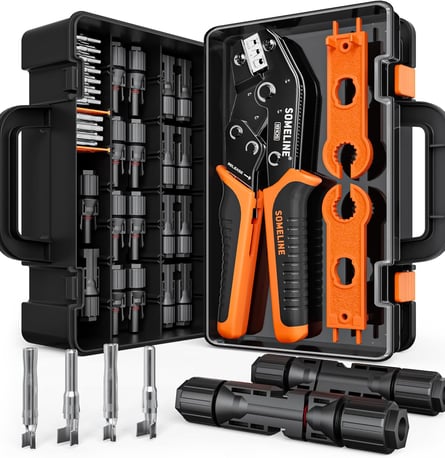
A solar system may seem complicated but once you grasp the basics, it is easy to customize and install. Here is the toolkit we used for installing the solar panels. A great toolkit comes equipped with:
Adjustable Crimping Tool, Two wrenches are special for mounting and disassembly of the plug and socket
Perfectly suited for 2.5/4.0/6.0mm² solar panel PV cables, this kit ensures a reliable and professional finish every time.
12 pairs solar panel connectors and 12 pairs solar panel connectors.
Want more help? Check out our other post on batteries and cable sizing as well as this tool that helps you size the right cable gauge where you get additional help to customize the system to your needs
Time to unleash the power of the sun and start your off-grid journey!


Suggestions for Popular Complete Solar Panel Kits
Eco Worthy -Offers complete kits ranging from 120kW to 680kW, with certain pre-assembled kits featuring MPPT technology for improved efficiency.
Renogy - Specialises in MPPT chargers, DC/DC chargers, and inverters. They also offer complete kits, primarily available in 100kW, 200kW, and 500kW options, ideal for various energy needs.
Dokio - Provides foldable and portable solar panel kits. They also offer pre-assembled kits specifically designed for 12V, 18V, and 36V systems, perfect for flexible and mobile applications.
Solar Panels in Series or Parallel Connection
To transfer energy, you need to connect the solar panels correctly
With the right solar system in your campervan,
the limit for adventure is endless
Which Solar Charge Controller is Right for You?
If you only go out occasionally and have a tight budget, a PWM can be an okay choice. But if you are a serious adventurer who wants maximum energy, especially on longer trips, then the MPPT controller is a clear choice!
Regardless of choice, a solar charge controller will keep the batteries safe and charged, so you can enjoy freedom without interruption 💡
Next Step?
Ready to choose a solar charge controller? Check out our guides on choosing battery types to complement your system!
The Budget Option
- Pulse Width Modulation (PWM)
PWM controllers are the simpler and cheaper variant. But is it worth it?
For a simpler setup or if you only use your van for weekend trips, PWM can be a sensible choice A PWM controller works by lowering the voltage from the solar panels so that it matches the leisure batteries.
The downside? It is not as efficient as the MPPT alternative, which means you may not get maximum charging on cloudy days
💰 Price: Around €25-40 and it's suitable for budget solutions and shorter trips
Popular PWM brands:
Our Recomendation
- Maximum Power Point Tracking (MPPT)
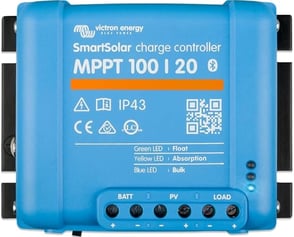
MPPT controllers are a bit more expensive, but here we are talking about efficiency on a whole different level! Instead of lowering the voltage, the MPPT controller can work at the solar panel's highest power point and convert that energy into the right power for your batteries
An MPPT controller can be up to 25% more efficient than a PWM controller, which means more charging even under difficult conditions. But watch out for cheap copies! If the price seems too good to be true, it often is
💰 Price: From €95 and up. An investment, but worth it if you want enough power to work, cook, and keep your van alive across the continent!
Popular MPPT brands:
Victron - Founded in 1975 in the Netherlands, known for its reliable off-grid battery inverter chargers and affordable solar controllers, especially in the car, motorhome, and boat market
Renogy - Offers premium 12V and 48V solar solutions designed specifically for motorhome life, ensuring simplicity and reliability every step of the way
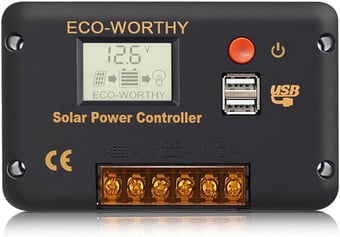
ECO WORTHY - Founded in 2007. It is a leading international manufacturer and supplier of lithium batteries and solar energy
Solar Charge Controller:
The Brain Behind Your Campervan Solar System!
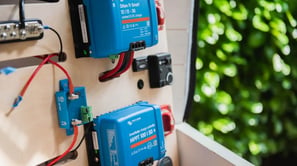
So, you have installed the solar panels and completed the wiring – now the fun begins! Soon your solar panels will start generating electricity, but before the power reaches the batteries, we need a hero in place – the solar charge controller!
What Does a Solar Charge Controller Do?
A solar charge controller, or charge regulator, is a must for your solar system. Its job is to regulate the voltage from the solar panels so that your leisure batteries receive the right amount of power. Without a controller, the batteries risk being damaged due to too high voltage – and trust us, no one wants to be stranded with dead batteries!
There are two main types of solar charge controllers to choose from, and which one you choose can affect both performance and your budget


Three Solar Systems for All Budgets
If you have never converted a van or similar to a campervan before, it can be very difficult to know what is needed and what it might cost. That was at least one of our biggest problems when we built Therefore, we have tried to help you along the way and have come up with three different package suggestions to at least give an estimate of what it might cost
Budget System, around €240 excluding battery
Perfect for basic electrical needs like lighting and mobile charging:
100 W solar panel: around €100
Inverter: around €35
Charge controller: around €50
Cable kit and mounts: around €30
Mid-Budget System, around €760 excluding battery
Handles a bit more and is suitable for longer off-grid stays:
3×100 W solar panels: around €300
Pure sine wave inverter: around €230
Charge controller: around €130
Mounting kit: around €100
High-End System around €1,875 excluding battery)
For those who want all the comforts like a refrigerator, coffee machine and more:
4×130 W solar panels are around €800
3000 W inverter: around €765
Charge controller: around €180
Mounting kit: around €100
How Much Solar Power You Need:
Calculate Your Watts
To calculate how much solar energy you need for your campervan, there are a few simple steps to follow:
List All Electrical Appliances
Think about, what gadgets will you use?
Common devices in a campervan can be:
LED lights
Refrigerator
Laptops
mobile phones
Fans
Water pumps
Kitchen lectronics like an induction hob Inverter
Device's Energy Consumption
Note each device's energy consumption (watts) and how many hours you plan to use it per day. If you have devices with energy consumption specified in volts and amps, use the formula:
Watt (W) = Volt (V) × Ampere (A)
Then multiply watts by the number of hours per day you use the device to get watt-hours (Wh) per day Watt-hours (Wh) = Watt (W) × hours per day
Calculate Your Daily Energy Consumption
Then compile in Excel where you can easily get an overview of all energy consumption, but also create simple formulas that can be adjusted and experimented with Take the power multiplied by the number of hours you will have the light on or the gadget, so you get your daily consumption.
Then sum up all the components' consumption to get your total. Divide the total power consumption by the voltage in your system (12V / 24V) so you get the answer to how many amps your system draws per day.
For example: Lighting 2.5w x 3pcs x 4h = 60Wh Mobile charger 4.0w x 2pcs x 3h = 16Wh 76Wh / 12v = 7A per day.
Sizing Solar Panels for Motorhomes
Adjust for Inefficiency
Many energy systems have energy losses, especially if you use an inverter to convert DC power from the solar panels to AC power. If your inverter, for example, has 85 - 90% efficiency, divide your total daily consumption by this to cover the conversion loss Adjusted consumption = Total daily Wh ÷ Inverter efficiency
For example, for a 12v battery with a daily consumption of 500Wh: 500Wh / 0.9 ≈ 555.6Wh
Determine Number of Sun Hours
Depending on your location and season, you can count on 3–6 sun hours per day. This is roughly how long the sun shines strongly enough to charge the solar panels
Calculate Number of Solar Panels
Divide your total daily energy consumption (Wh) by the number of sun hours to get the wattage your solar panels need to have
Required solar panel power = Total daily Wh ÷ Hours of maximum sunlight
For example, if you have a consumption of about 500Wh and have 4 sun hours in a day, you need a panel capacity of: 500 Wh ÷ 4 hours = 125 W
Add a Safety Margin
Since the weather can be unreliable, most people add a safety margin of 25-50%. Multiply the calculated power by 1.25–1.5
How to Install Solar System?
Now that you know what you need, it's time to install the system!
Order All Components
Make sure all parts are in place so the installation can run smoothly
Create a Wiring Diagram
A simple diagram helps you keep track of how all parts are connected, from the solar panels to the charge controller and batteries
Mount the Solar Panels
Clean the roof and carefully mark where you will drill. Remember that the cables should be routed safely
Complete the Connection
Connect the panels and connect them to the charge controller and battery according to the diagram
Safety Check
Do a final check to ensure everything works. Consider hiring an electrician for extra security


Maintenance and Operation
Just like your campervan's engine needs service to keep running smoothly, your solar panels also need some maintenance to stay in top shape. One of the most important parts of maintaining well-functioning solar panels is cleaning them and removing debris. Dirty solar panels covered with leaves will perform much less efficiently than clean and unshaded panels Keep your panels sparkling clean! If you regularly check and clean your panels, you not only extend their lifespan but also allow them to provide more energy to your battery. And who doesn't want to stay off-grid longer? A little effort can make a big difference!
What is the Lifespan of Solar Panels on Camper Vans?
Apart from disasters during travel, solar panels will last anywhere from 15 to 30 years. It's safe to say you won't need to replace your van solar panels for a while! Over time, the energy production of a solar panel will generally decrease by ~0.5% per year, so at the end of a 25-year useful lifespan, they will produce ~12% less energy than they did initially. Each panel will vary slightly, with more expensive panels degrading slower and having a longer rated lifespan
Important Factors Affecting the Choice of Solar Panels
Geographical Location
Solar energy is more abundant in some parts of the world than others. Places closer to the equator receive more consistent sunlight year-round compared to higher latitudes Example: In southern Spain, solar panels can produce up to 40% more energy annually than in northern Germany, due to the difference in sunlight hours and intensity
Season
The output of solar panels varies significantly with the seasons. In summer, longer daylight hours and a higher sun angle increase energy production. In winter, shorter days and lower sun angles result in reduced energy production Example: A 300W solar system in London can generate about 1.2 kWh/day in summer but only 0.3 kWh/day in winter
Weather
Cloud Cover
On cloudy days, the output of solar panels can decrease by 50-90% depending on cloud density Rain: Although rainy conditions reduce sunlight, rain can improve the efficiency of solar panels by cleaning dirt and debris that would otherwise block sunlight
Temperature
Solar panels operate more efficiently in cooler temperatures. While panels are most efficient under direct sunlight, cooler temperatures increase their efficiency due to lower thermal losses. For every 1°C decrease below 25°C, the efficiency of solar panels improves by 0.3-0.5%
Tilt Angle and Orientation of Solar Panels
Solar panels perform best when angled directly towards the sun. The optimal tilt angle changes depending on your latitude and season. Panels mounted flat on your van roof will produce less energy than those with adjustable tilt, especially in winter Use a tilt mount to adjust the panel's angle based on your location. If you are in the northern hemisphere, tilt the panels at an angle equal to your latitude for optimal performance year-round
Final Thoughts
That's all about our campervan solar guide! I hope this guide has helped you understand how solar power works and has given you a clear picture of what type of solar setup you want for your van conversion
Whether you're looking for a minimal solar setup or need enough power to run everything from your blender to your hairdryer, I hope you've gained some clarity on what your campervan solar system needs. Now it's just a matter of starting to plan and looking forward to all the amazing adventures that await you and your new, power-packed friend on wheels!
Installing and maintaining a solar system in your campervan may seem daunting, but with the right information and a little patience, it's a completely manageable task. Remember that every step you take towards using solar energy in your campervan not only makes your life easier but also helps you live more sustainably and responsibly
Let the sun shine on your adventures, and don't forget to give your solar panels some love! Check out more posts on Camperpals.com to continue your journey towards the perfect campervan lifestyle 🌞✨


Guide
Your resource for camper van electrical systems.
Contact us
Support
© 2024. All rights reserved.

